Holy Arugula

Bed of arugula & other greens at Horton

by Reiden Gustafson

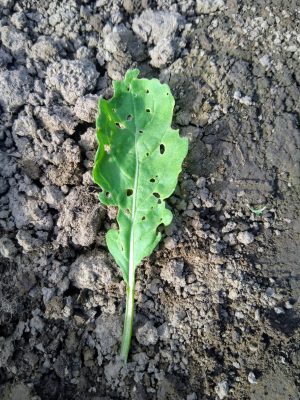
“What’s causing all those tiny holes in the arugula?”

As an apprentice working the Horton Road market stands, I’ve heard this question asked several times. In an attempt to provide our customers with a more thorough answer, I put together a short Q&A regarding arugula and one of its biggest admirers.

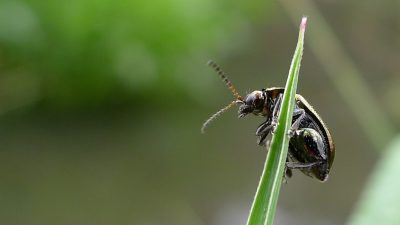
Question: What’s causing all those tiny holes in the arugula?  Answer: A black jumping beetle measuring only 1/15 of an inch. It’s commonly known as flea beetle. Flea beetles are avid leaf eaters. They have strong hind legs which help them jump. They also have the ability to fly. Both modes of transportation aid in seeking out meals by way of smell and sight. Here in Oregon flea beetles typically have three generations per growing season, with the first round of adults arriving in early-mid summer.

Flea Beetle. Photo by John Tann, CC 2.0

Question: What crops do flea beetles feed on?  Answer: There are three main flea beetles found in the Pacific Northwest. The crucifer flea beetle (Phyllotreta cruciferae) feeds on brassica crops such as arugula, kale, broccoli, cauliflower, radish, turnip, tatsoi, etc. Other types of flea beetles feed on potatoes, tomatoes, and other plants in the solanaceae family.

Question: What are some control options available for organic farms and gardens?  Answer: (see below)

  1. Row cover: Floating row cover products can be used to keep flea beetles off crops. Row covers can work well in certain conditions, however, they should are only effective at keeping insects out if they’re kept closed at all times. This can be a problem during hot sunny weather.
  2. Organic insecticide: Most organic insecticide sprays  only work when they make physical contact with the insect. Flea beetles are quick to jump away when people approach them, making spraying difficult. Many insecticides (even organic ones) are also harmful to beneficial insects, so this is an important consideration.
  3. Trap crops: Some crops such as mustards and bok choy are especially tasty to flea beetles and can be used to lure pests away from the main crop. Trap crops can be planted in rows next to the main crop or as a bordering edge around the entire garden or field.
  4. Companion planting: Dill, green onion, and marigold are all examples of crops that can be interplanted near the main crop to help confuse and/or repel flea beetles.
  5. Sticky traps: As mentioned on a recent Farmer to Farmer podcast with Chris Blanchard and guest Olivia Huber, large sticky traps can be made using tangle feet (orchard glue paste) and a sheet of paper as wide as the farm/garden beds. The paper is simply carries over the beds, sticky side down. Given the beetle’s natural tendency to jump away from anything approaching, a large percentage will end up jumping into the trap.

Question: What does Horton Road do to control flea beetle?  Answer: Horton chooses to focuses on maintaining a high level of soil health and the best field germination possible. Flea beetles tend to be less prevalent in high density plantings compared sparse or stressed stands.

Arugula leaf with insect damage

Question: Is it bad to eat holy arugula or other greens?  Answer: No. The damage is cosmetic and doesn’t generally have an effect on flavor. Occasionally Horton may decide to forgo selling arugula at market one week because the available planting has too much insect damage… But don’t worry, the farm always has more planted and ready for harvest again soon.

Cheers to my fellow arugula lovers out there, and thanks for supporting organic agriculture!

Reiden is a first year apprentice at Horton. Having been born on the Oregon coast and then spending most of her life living elsewhere, Reiden is happy to once again be back in the familiar and beautiful coastal range.


Sources:

Farmer to Farmer podcast: http://www.farmertofarmerpodcast.com/

Parker, Joyce, et al., Organic Management of Flea Beetles. Pacific Northwest Extension, 2012, cru.cahe.wsu.edu/CEPublications/PNW640/PNW640.pdf.

CSA Week #8

Wow!  Here come the crops!  Summer has finally kicked in and the fields are beginning to burst with veggies.  A few new things for you this week – Enjoy!

What’s in Box #8?

Salad Mix: More delicious greens for you this week. For best storage, keep greens in the fridge, in a plastic bag or other covered container, with just a little bit of moisture to prevent wilting.

Basil:  This herb is loving the heat! For best storage, keep in a covered container or plastic bag in the fridge, with just a little moisture or in a jar like cut flowers.

Little Gem Lettuce: They’re back! These little delicious heads could top your sandwiches or become a salad on their own.

Cucumbers:  Diva variety. No need to peel these. They are seedless and burpless. They definitely are a cool and crisp addition to many summertime dishes. Slice them up, sprinkle with a little salt and you have a terrific snack!

Carrots: A Nantes-style called Nelson.  These roots are very sweet and will stay fresh longer if you remove the greens.

Zucchini: Raven variety. These can be eaten raw or cooked.  They are especially good on the grill with some olive oil and lemon juice. Just cut into quarters (lengthwise) or flat slices for easiest grilling.

Cauliflower: Clarify variety. This is a new variety for us – let us know what you think. We have a few rotations of this in the field, so we will hopefully see it again.


Recipes:

Basil and Cucumber Sorbet
Something a little different to try with basil, instead a savory dinner you can try a sweet dessert!   ~ Heather

Ingredients:

  • 4 cups chopped cucumbers
  • ½ cup honey or maple syrup
  • ½ cup fresh basil leaves
  • 1 tbs. rum

Put all of the ingredients into a blender and blend until smooth, refrigerate, then put the mixture into an ice cream maker.

https://www.scalingbackblog.com/29628494098/?utm_campaign=yummly&utm_medium=yummly&utm_source=yummly

♦            ♦            ♦            ♦            ♦            ♦            ♦

Cauliflower Buffalo Wings

https://www.hotforfoodblog.com/news/2015/7/14/jjs-kitchen-cauliflower-buffalo-wings?rq=Cauliflower%20Buffalo%20Wings

I have made this recipe a number of times, and mostly for meat-eaters who are blown away with how tasty these wings are! My friends request this recipe for every get-together, and it’s versatile so you can personally choose different sauces for whatever you’re in the mood for.   ~ Taylor

♦            ♦            ♦            ♦            ♦            ♦            ♦

Baked Zucchini Fries

https://theplantphilosophy.com/lets-cook-baked-zucchini-fries/

If you know someone who counts fries as a vegetable (or if you are that person), then try swapping the regular ol’ potato out for some zucchini! These zucchini fries are baked instead of fried so in my book these definitely count as a serving of vegetables.   ~ Taylor

Seed Sowing

Here at Horton Road Organics we apprentices are assigned a job and mine is seed sowing. It can be a tedious task working with such tiny seeds, but the end results are amazing. Let me take you through the process of seed sowing.

Once a week I make a seed starter soil mix. That mix has things such as coconut fiber, vermiculite and earthworm castings ( aka worm poop!). Those ingredients along with others provide the seeds with much needed nutrients and essentials to germinate. I think pick out the types of flats that will go along with the different seeds and fill those flats with the seed starter mix. Each seed is different. Trials, tried and true varieties, there are oblong seeds and round seeds, seeds with ridges and seeds that are smooth. Not all are sowed the same, some are done by hand, with a little dropper or with a contraption that drops more than one hundred seeds at a time.


Once seeded they are tucked in with a tad bit more of the mix and labeled, then they go right into the green house to germinate. After germination they go to the field to be planted out and grow into the vegetables you know and love to eat! It is a job that requires much attention, as each seed is very important, but for me it is also a wonderful way to relax. To be at the very beginning of the process of vegetable production and be able to see it all of the way through is a tremendous feeling.


Heather is from California and moved to Oregon to experience the life of a farmer. She is enjoying apprenticing at Horton Road Organics and getting her hands dirty and full of vegetables! During her down time she like to hang out with her cat or ride her horse. She’s excited to see what other opportunities come her way this year!

CSA Week #7

Hope everyone stayed cool over the weekend.  The crops (and weeds) are loving the heat and extra water.  We are really seeing a difference in the fields as everything seems to be growing more rapidly than before.

What’s in Box #7?

Salad Mix: More delicious greens for you this week. For best storage, keep greens in the fridge, in a plastic bag or other covered container, with just a little bit of moisture to prevent wilting.

Parsley:  This herb is a better keeper than basil or cilantro because its leaves are more succulent. You can definitely cook with it even when it becomes a little wilted. For best storage, keep in a covered container or plastic bag in the fridge, with just a little moisture.

Kale: It’s back! Red Russian variety. Time for cold kale salads to beat the summer heat.

Green Onions:  Parade variety. These are on a nice rotation for us which is why you are seeing them so often this season.

Carrots: A Nantes-style called Nelson.  These roots are very sweet and will stay fresh longer if you remove the greens.

Radishes: Cheriette variety. Add great flavor and crunch to your salads and other dishes.  These can become spicier after a span of hotter weather – try one to find out!

Sugar Snap Peas: Cascadia variety. A treat that is not around very long – probably the last week for them.  Edible pods with a super sweet crunch.  Can be cooked or eaten raw.


Recipes:

Garlic Snap Peas

Ingredients:
2 cups fresh sugar snap peas
2 teaspoons vegetable oil
1/8 teaspoon salt
Pinch ground black pepper
2 cloves garlic, minced

Instructions
1. Prepare snap peas by cutting off the tips on each end of the pods.
2. Preheat oil in a wok or medium skillet over medium/high heat.
3. Saute snap peas in oil with salt and black pepper for 2 1/2 to 3 minutes, tossing often, until the peas are cooked, but still crispy. The pods should begin to get a few dark brown scorched spots developing on them when they’re done. Add the minced garlic, toss a bit more, then immediately pour the snap peas out onto a serving platter. If you keep the garlic in too long it could burn and turn bitter, so don’t leave it in the hot pan for any longer than about 10 seconds.

Serves 2 to 4.

Link: https://topsecretrecipes.com/PF-Changs-Garlic-Snap-Peas-Copycat-Recipe.html

♦            ♦            ♦            ♦            ♦            ♦            ♦

Carrots with Hijike (or Arame)

Another great recipe from Deborah Madison’s Vegetarian Cooking for Everyone.

2 cups dried hijiki or arame
Soy sauce or tamari (to taste/optional)
2 tbsp dark sesame oil
2 tbsp slivered ginger
3 carrots, julienned
Salt
Toasted sesame seeds

With Hijiki: Cover the hijiki with water and soak for 15 minutes. Drain, then put in a saucepan with fresh water to cover, and 2 tbsps soy sauce. Bring to a boil, simmer for 15 minutes, then drain again.
-or-
With Arame: Soak for 3 minutes, then drain without parboiling.

Heat the oil in a wide skillet over high heat. Add the ginger and carrots and stir-fry until the carrots begin to color around the edges, about 2 minutes. Add the seaweed and cook 5 minutes more, tossing frequently. Add 1 tbsp soy sauce and let it cook off. Taste, and season with salt and or soy sauce. Garnish with toasted sesame seeds.

♦            ♦            ♦            ♦            ♦            ♦            ♦

Spaghetti with Parsley Pesto

Swapping traditional basil for flat-leaf parsley for this pesto recipe makes for a balanced sauce that allows you to really taste the nuts, the olive oil, the Parmesan. Makes 6 Servings.

Ingredients
• 1 pound spaghetti
• Kosher salt
• ½ cup unsalted, roasted almonds
• 4 cups (packed) flat-leaf parsley leaves
• ¾ cup chopped chives
• ¾ cup extra-virgin olive oil
• ½ cup finely grated Parmesan
• Freshly ground black pepper

Preparation
Cook pasta in a large pot of boiling salted water, stirring occasionally, until al dente. Drain, reserving 2 cups pasta cooking liquid.
Meanwhile, pulse almonds in a food processor until smooth. Add parsley, chives, oil, and Parmesan; process until smooth. Season pesto with salt and pepper.
Toss pasta and pesto in a large bowl, adding pasta cooking liquid by 1/4-cupfuls until saucy. Season with salt and pepper.
Do Ahead: Pesto can be made 5 days ahead. Cover surface directly; chill.

Link: http://www.bonappetit.com/recipe/spaghetti-parsley-pesto


Planting the Future with Bare Hands

Towards the end of working my very first Saturday farmer’s market as a Horton Road apprentice, a young man asked me whether our farm had a plug planter. Brand new to farming, I had no idea what he was talking about so he explained that there are attachments for tractors that plant starts. I chuckled a bit and replied, “oh, my fellow apprentices and I are the plug planters at our farm…” As he walked away I wondered to myself how a machine could mimic the simple, yet fine-tuned choreography we call plant out.

Plant out generally takes place on Tuesday mornings and can last anywhere from 30 min to 3 hours depending on how much we are planting and how intensive each crop is. There are some crops that are planted using a tractor (carrots, beets, cilantro, spinach) or are specifically attended to by Lisa (baby spinach and beet greens) and Debra (salad greens), but the apprentice team hand plants a large amount of the crops that you’ll see and eat.

Head lettuce and baby lettuce, which you’ll find in the original and subtle salad mixes, are the most frequently planted crops. Head lettuce needs to be planted 12 inches apart and baby lettuce 6 inches apart. Thankfully, we are not expected to know these distances simply by sight or smell – we use the hole punch that literally punches holes in the ground that are 12 inches apart in all directions from each other. It takes two people pulling the hole punch to mark a full bed – the more synchronized the better – and provide us with our template for dropping and planting.

Next two people pick up trays of plants and drop them at roughly the appropriate distance along the rows. Behind them at least two other people follow planting the starts in their appropriate spots with a swift scoop of the dirt, firm placement of the plug and gentle tuck to ensure a stable foundation from which to grow from. Time is of the essence when planting because we don’t want to be planting crops in the direct heat or else they may struggle to take up water or wilt so it is critical that the whole team is constantly moving and flowing between tasks until the plant out is completed.

A tractor attachment that can do all that we do as a team of 4-5 people sure does sound nifty, and as we saw and learned at a field trip to a nearby farm it is essential for larger farms to get their crops in the ground in a reasonable timeframe. However, there is something pretty awesome about being able to look down a row of newly planted crops and know that you did your best to give those plants a good start and you did it with your bare hands.


Laura is a first year apprentice at Horton Road. This is her first time working on a farm and she loves the opportunity to work with her hands, to learn new skills and to spend so much time outside. She’s been tasked with helping manage plant outs and is sure glad Lisa and Bill don’t seem to mind answering her questions week after week.