CSA Week #11

We are starting the 2nd half of the CSA season and there is so much to look forward too.  This week, you’ll get to enjoy the first of the sweet corn. Yum!  On the farm, we are really feeling the busy season.  Fast-paced work, big harvests and lots of weeding are the norm.  We’re sore, tired and enjoying the work.  Cheers to local, organic produce and thank you for supporting Horton Road Organics!

What’s in Box #11?

Salad Mix: More delicious greens for you this week. For best storage, keep greens in the fridge, in a plastic bag or other covered container, with just a little bit of moisture to prevent wilting.

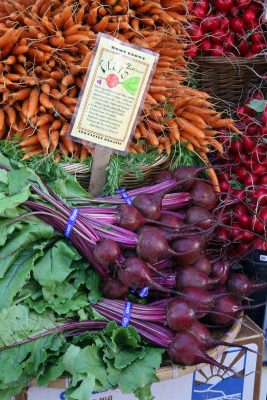
Carrots: Nelson variety. They have a delicious sweet flavor and crunch. These can last quite a while (months!) in the fridge if they are kept covered in a plastic bag.

Cilantro:  Marino variety. For best storage, keep in a covered container or plastic bag in the fridge, with just a little moisture or in a jar like cut flowers. Cilantro will not keep as well as basil or parsley, so plan to use in a timely manner.

Swiss Chard: Bright Lights variety. We are just starting to harvest our new bed of chard that will last us through the Fall and the leaves are a little delicate right now.

Sweet Corn:  The first of the season. Enjoy this new variety of white corn that we are growing this year, Temptress!

Green Onions: Parade variety. A perfect addition to so many dishes. We are overloaded right now!

Radishes: Cheriette variety. For longer storage, remove the greens. The heat (temperature) brings out the heat (flavor). So, expect these to have a little kick.

Recipes:

In-Husk Grilled Corn with Herb Butter
https://www.epicurious.com/expert-advice/how-to-grill-corn-on-the-cob-with-husks-article

Grilling ears corn while still in the husk will give them a smoky flavor as the husks allow smoke to permeate the corn, as opposed to using tin foil. The husks also protect the corn from direct heat from the grill while steaming the corn efficiently. ~ Derek

To prepare the husk, pull it back and leave it still attached at the bottom of the cob. Remove the corn silks from the cob and then spread with seasoning. For this step, try the herb butter below! Pull the husk back into place and grill for about 10 minutes on medium-high heat or until the corn is tender (husks will be charred and beginning to shrivel).

Ingredients:
1/2 cup (1 stick) unsalted butter, room temperature
2 tablespoons finely chopped fresh tender herbs (such as cilantro, chives, and/or parsley)
1 1/2 teaspoon kosher salt
1/2 teaspoon ground black pepper
Cayenne pepper to taste
8 ears corn, shucked
1 tablespoon vegetable oil
Preparation:
Prepare grill for medium-high heat. Mix butter, herbs, salt, pepper, and a pinch of cayenne pepper in a small bowl. Set herb butter aside.

♦            ♦            ♦            ♦            ♦            ♦            ♦


Reiden’s Cilantro Salsa

I recently invested in a food processor and was happy to find that salsa making is now so much faster. While this salsa contains several components, the cilantro definitely takes center stage (as it should in my opinion). I’ve found that it works best to process the garlic and onion by themselves first, then add everything else. –Reiden

Ingredients:
3 roma tomatoes
3 jalapenos (mild peppers can be substituted)
1 large bunch of cilantro
4 garlic cloves
½ large yellow onion
1 t cumin
1 t salt (I usually use more, but some people prefer less)
½t black pepper

♦            ♦            ♦            ♦            ♦            ♦            ♦

Spicy Asian Stir-Fried Swiss Chard
https://kalynskitchen.com/recipe-for-spicy-asian-stir-fried-swiss/

This recipe uses both the stems and leaves of the chard so nothing is going to waste. For storing fresh swiss chard, place unwashed chard in a plastic storage bag, squeeze as much of the air out of the bag as possible, and place in the refrigerator for up to 5 days. ~ Taylor

Cultivation On The Farm

As previously stated in past blog posts, each apprentice here at Horton Road Organics has a specific job that they oversee on the farm. My job is cultivation, which encompasses duties that include thinning of crops, weed control, and a weekly field walk. Cultivation is necessary on any size farm to keep weeds from stealing the nutrients, space, water, and sunlight that the crops need, to prevent weeds from flowering and spreading more seeds, and to make the harvesting process easier.

Here at Horton Road Organics, our beets are directly sown into the soil. Through this process, there isn’t enough room for each seed to grow into full-sized beets so a couple of weeks after they are planted, a cultivation task for us to complete is to thin the beets. Thinning the beets means we make room for roughly 4-5 inches of space between each beet and pull any beets inside this parameter. Before you start to worry about all of the beets we may be wasting, just know that this process is necessary for the plants in the long-run to grow into the beautiful sized beets you all enjoy today.

At this point, you may be thinking we use our hands to weed every bed on the farm, but I’m sorry to tell you that we don’t work that hard. We use different tools for different weeding tasks. Our main tools are our hula hoes and hand hoes. Hula hoes have a swivel head and a long handle so we use those standing up. Our hand hoes, you guessed it, go into our hands and are occasionally accompanied with a bucket for the weeds that are too big to be left in the bed. Crops that we mainly hula hoe, or stand-up hoe, include adult lettuce, kale, chard, and spinach. Crops that favor the hand hoe are salanova lettuce, beets after they are thinned, and green onions. Besides using hoes, we actually do use our hands for quick hand weeds and hand pulls on beds of crops. A quick hand weed is used on crops that are too big for both hula and hand hoes, where we can quickly walk down the bed and pull any weeds that are peeking through the crops. A hand pull is used mainly on our crops grown in rows, such as carrots and cilantro, where weeds tend to camouflage and grow between each individual plant.

In order for the group to know which bed to go to during the work day and which cultivation task to complete, I put out signs stating if the bed needs a hand hoe, stand up hoe, quick hand weed, or hand pull. Every Friday, I venture out to each field and greenhouse to determine the urgency and task needed for cultivation on each crop during the following week. I then place the signs to the corresponding beds and write that action down on a piece of paper. After my field walk, I write notes about which crop needs which cultivation task on a dry erase board that is broken up by field. It’s important to prioritize which crops need to be tended to first based on weed growth so that we don’t, knock on wood, lose any crops.


Taylor is loving her first experience in Oregon and first time working on an organic farm. Her favorite vegetable to harvest at Horton Road Organics is kale.

CSA Week #10

Can you believe it?  This week we are completing the first half of the 2018 CSA!  Time flies on the farm.  The fields are looking beautiful right now – lots of color and new plantings coming on each week.  The hot season crops (peppers and tomatoes) are soaking in the sun and just starting to blush.  Happy August to all!!

What’s in Box #10?

Salad Mix: More delicious greens for you this week. For best storage, keep greens in the fridge, in a plastic bag or other covered container, with just a little bit of moisture to prevent wilting.

Carrots: Nelson variety. We are now into loose carrots. They have a delicious sweet flavor and crunch. These can last quite a while (months!) in the fridge if they are kept covered in a plastic bag.

Basil:  Aroma 2 variety. For best storage, keep in a covered container or plastic bag in the fridge, with just a little moisture or in a jar like cut flowers.

Beets: Red Ace variety. The greens look excellent right now.  Don’t forget to use them along with the sweet roots.

Cucumbers:  Diva variety. No need to peel these. They are seedless and burpless.  We may have just a couple more weeks with cucumbers.

Green Onions: Parade variety. A perfect addition to so many dishes. We are overloaded right now!

Garlic: Music variety. These bulbs have been cured for storage, so no need to use right away.  Store in a dry place, on your kitchen counter is fine.

Kale: Red Russian variety. We are just starting to harvest from a new planting, so you get the first pick! These greens will carry on long into the fall.


Recipes:

Mediterranean Cucumber and Tomato Salad
Quick and simple, here is a neat recipe that can help you enjoy your cucumbers. ~ Heather

Ingredients:
1 cucumber (chopped)
1 pint cherry tomatoes (halved)
3 radishes (chopped, or can be replaces with a few tbsp. red onion, chopped)
1 yellow or red bell pepper (diced)
A handful fresh parsley
1 tbsp. olive oil
Juice of 1 lemon
Salt to taste

Combine all ingredients, chill or serve at room temperature.

www.veggiessavetheday.com/mediterranean-cucumber-tomato-salad/

♦            ♦            ♦            ♦            ♦            ♦            ♦

Beet Burgers

Black bean burgers and tofu dogs can sure get tiresome as the only vegetarian choices at a BBQ but these beet burgers will brighten any bun and keep you eating fresh at your next outdoor gathering or be a nice change of pace at home. Beets and feta are not just for your salad plate after this recipe! ~ Laura

Makes 3-4 burgers
Adapted from: https://food52.com/recipes/24287-beet-and-feta-burgers

1.5 cups grated beets (about 2-3 beets)
½ onion
1 garlic clove
1 tablespoon olive oil plus 1 tablespoon for frying the burgers
1 egg
¾ cup oats or breadcrumbs
3.5 ounces of feta cheese or firm tofu
¼ cup fresh basil leaves
Salt and pepper to taste

1. Peel and grate beets, onion, and garlic on a box grater or use a food processor with the grating blades attached.
2. Place the grated vegetables in a large mixing bowl.
3. Add olive oil, eggs, and rolled oats and mix everything well.
4. Add sheep’s cheese or tofu, basil, salt, and pepper and stir to combine.
5. Set aside for about 30 minutes, so the oats can soak up the liquid and the mixture sets (this step is important for the patties to hold together).
6. Try shaping a patty with your hands. If the mixture is to loose, add some more oats.
7. Form 3 to 4 patties with your hands.
8. Set patties in the fridge for 20-30 min to firm up
9. Grill the burgers a couple of minutes on each side – or fry them in a frying pan by heating a tablespoon of olive oil and fry until crisped on both sides.

♦            ♦            ♦            ♦            ♦            ♦            ♦

Red Beans and Kale
A Horton Road throwback, dug up from our past recipe collection. Enjoy! ~ Lisa

Coconut oil
1 block firm tofu, pressed and/or strained and cut into strips
2 cups dry red beans or kidneys
4-5 cloves garlic, minced
1-2 cayennes, chopped
2 Tbl lime juice
2 Tbl tamari, or to taste
Corn tortillas, quartered
1/2 – 1 bunch kale, chopped

Soak dry beans overnight covered in water. The next day, change water and cook until tender, up to 2 hours. Rinse beans. • Fry tofu in plenty of coconut oil in a heavy skillet on moderately high heat, until golden on both sides. Add garlic, cook 1 min. Add beans and corn tortillas, cook a few minutes more, until tortillas start to soften. Pour in tamari and lime juice, add kale and cayennes. Cover lightly and cook, until kale is tender, 10-12 minutes, stirring occasionally. Add more liquid as needed.

Thursday Morning Harvest

I enjoy writing these blog posts to you from the farm, as I grew up with many local CSA programs, farmers markets, and farm stands. I always loved how the fresh produce was delivered right to the neighborhood, and also loved seeing the farms that we visited for on-site pick ups. My parents would tell me how important it was for the farm and how our involvement helped the vegetables grow. I loved that. I also grew up attending seasonal events that the closest farming family to us, one that focused on orchards and livestock, would throw for the community. I vividly remember the smell of apple cider and selecting our family’s thanksgiving turkey from the field.

I always assumed that these were how small farms ran; CSA programs, farmers markets, and some who had the space and location to host community events. I had never thought that a small farm might sell to restaurants or grocery stores. The two concepts seemed separate to me, for the only grocery stores I had known were the Safeways of the east coast. My area of rural Pennsylvania had no natural food stores, nor anywhere that one could find fresh, organic produce other than directly from the farmer. Obviously, times are changing. And Eugene happens to be blessed with many food stores that provide local fresh food, some that have been around for decades. I am really enjoying living in a community that was one of the original radical pioneers in a movement to expand the reach of fresh and healthy food. Back in Pennsylvania, it’s nice to now be able to supplement the produce of a CSA box with other local staples that support other farms and artisans.

Here at Horton Road, each of us five apprentices is assigned a specialized job for the summer. Among our many other farm tasks, this is a job that we manage and learn in depth throughout our time here. My job is to deliver our produce every Monday and Thursday into town. This includes both the deliciously packed CSA boxes and bulk orders for local grocery stores and restaurants. So the farm mornings here differ depending on what day it is, and thus where the harvest of the morning is headed. We typically harvest four out of five work days. I thought that I would take you through a typical Thursday morning harvest, in which our focus is harvesting for Thursday afternoon wholesale deliveries.

By this point in the season, I hope you have all have had the pleasure of enjoying a refreshing and tasty salad mix. Getting to know the tastes of the separate greens is fun, as is seeing what they all bring to the table when mixed together. We each have our own green that we cut during morning harvest, allowing us to get to know it on different levels, one of which is where exactly to make the cut on the stem. This is a lovely task at 6:30am that requires precision and alertness, since we are all wielding sharp knives. My green has been red mustard. So I head out to the bed of mustard leaves, many times spotted with morning dew and delicately soft before the sun has peaked out above the neighboring mountain, and cut a few cases worth. The plantings of each bed of greens are staggered and are done often to ensure that we will be cutting them in their ready prime on these mornings. Then I head to my next crop of the morning (this is the point where many of us go our separate ways to different crops). I have been harvesting a lot of kale within the last two weeks. Kale usually follows salad greens and spinach, as it needs to be harvested before the heat of the sun affects the tenderness of the leaves. Kale is fun in a different way…no tools are involved during the harvest other than my hands. The stem of a good, large, and well-colored leaf is snapped at its lowest point, with caution to not crack any leaves as my hand descends down the stem. This is a plant that can be “picked hard”, which means we can pick each until there is only one or two small leaves left per plant. They respond well to the this and grow new leaves back quickly and fully. A bed of kale can provide over and over again. Once our number of kale bunches is met, I head to again to a knew crop awaiting removal from its home in the ground.

This is when we focus on many of the plants that are not under such a time requirement of the sun. This includes carrots (which would usually be next), radishes, green onions, beets, zucchini, green beans, celery, and cucumbers, among others. Cucumbers have been one of my favorite to harvest recently. They are grown in two of the five greenhouses and have just begun to be included in our morning harvest as of two weeks ago. These are a sort of a jungle to navigate through in order to find mature cucumbers, which are very very close in color to the large leaves they hide behind. This lends the harvest to being sort of like a puzzle, or an I-spy. We scan the plants in this manner from one end of the greenhouse to the other, with plastic buckets that we place the mature and clipped cucumbers into. We usually fill about ten or so of these buckets each harvest. I love doing this barefoot, since we need to find places to step amongst the plants that don’t crush any leaves or flowers of future fruits. This allows me to find good placement and it also feels great to have the soil in between my toes early in the morning.

Once this is finished, the packout (where we gather, prepare, and box the produce) is full of various vegetables, including those that others have harvested this morning. At this point, a few of us focus the rest of our morning on washing and packaging the produce, labeling, and organizing them into our walk-in fridge. Here they sit, harnessing the flavors of the early sunrise harvest, until I pack them into the farm’s pick-up truck after lunch and drive them into town. By the early afternoon they are in the hands of those who are ready to enjoy them. There’s nothing like the taste of vegetables that were in the soil just hours before.

Two beds of cucumbers awaiting morning harvest in Greenhouse 2


Derek is from Eastern Pennsylvania and is here for his first organic farming apprenticeship. He is enjoying his first time living in the Pacific Northwest and is excited to see where and what his experience at Horton Road Organics may lead to.

CSA Week #9

What’s in Box #9?

Salad Mix: More delicious greens for you this week. For best storage, keep greens in the fridge, in a plastic bag or other covered container, with just a little bit of moisture to prevent wilting.

Cilantro:  This herb is loving the heat! Not a great keeper, so use in a timely manner. For best storage, keep in a covered container or plastic bag in the fridge, with just a little moisture or in a jar like cut flowers.

Celery: Tango variety. The first celery of the season. Celery can wilt if not covered.  You can cut all of the stems into sticks and cover them with water (in a bowl) to keep them crisp longer.

Cucumbers:  Diva variety. No need to peel these. They are seedless and burpless. They definitely are a cool and crisp addition to many summertime dishes. Slice them up, sprinkle with a little salt and you have a terrific snack!

Green Onions: Parade variety. A perfect addition to so many summer dishes.

Zucchini: Raven variety. These can be eaten raw or cooked.  They are especially good on the grill with some olive oil and lemon juice. Just cut into quarters (lengthwise) or flat slices for easiest grilling.

Potatoes: Carola variety.  These aren’t fully cured for storage, so please keep them in the fridge. With celery and green onions, is it time for potato salad?


Recipes:

Mint Cucumber Sandwiches
Looking forward to your next summer picnic? Here is a light, simple and portable picnic food that is refreshing as any afternoon spent out under the summer sky. ~ Heather

Ingredients:

  • 3 tbsp. softened butter (unsalted)
  • Sourdough bread
  • 1 large thinly sliced cucumber
  • 2 med tomatoes
  • ¼ tsp. salt
  • ¼ cup fresh mint leaves

Spread the butter on the slices of sourdough. Evenly layer the cucumbers and tomatoes on the slices, sprinkle with salt, pepper then add the mint.

www.tasteofhome.com/recipes/mint-cucumber-tomato-sandwiches

♦            ♦            ♦            ♦            ♦            ♦            ♦

Cucumber Celery Herb Salsa

Source: Salsas & Sauces (Gina Steer)

I’m always looking for ways to eat fresh veggies for the crunch factor. When I made this salad I doubled the herb quantity and the oregano ended up being overpowering at 2 T. Next time I’ll experiment with replacing the parsley & oregano for cilantro, dill, and/or mint. Feel free to be creative with the herbs. –Reiden

Peel the cucumber very thinly and cut lengthwise into quarters. Scoop out and discard the seeds. Finely chop the flesh, put it into a nonmetallic strainer, and sprinkle with the salt. Let drain for 15-20 minute, then rinse thoroughly and drain well. Put in a small bowl.

Add the scallions, celery, and green bell pepper to the bowl and mix well. Add the yogurt and stir well before adding all the herbs. Stir again, then spoon into a serving dish. Lightly cover and let stand in a cool place, but not the refrigerator, for 30 minutes to let the flavors develop.

Ingredients:
3 in. piece of cucumber
2 t salt
6 scallions finely chopped
2 celery stalks finely chopped
1 green bell pepper, peeled, seeded, and finely chopped
½ cup yogurt
1 T shredded fresh basil
1 T chopped fresh parsley
1 T chopped fresh oregano

♦            ♦            ♦            ♦            ♦            ♦            ♦

Spicy Cilantro Slaw

Source: The Herbal Kitchen (Jerry Traunfeld)
8 servings

I recently ate at a small diner in Albuquerque and instead of the typical options for side salad or fries, the ABQ diner had their own southwestern salads. I altered the original recipe to mimic one of the ABQ salads which was mostly red pepper and jicama. The original recipe calls for cabbage instead of jicama, which I’m sure would also be tasty. –Reiden

Ingredients:
¼ cup mayonnaise
¼ cup apple cider vinegar
2 T lime juice
1 T sugar
¼ cup soy sauce
2 t sriracha (or other hot sauce)
½ lb. jicama finely sliced
½ lb. sweet peppers seeded and finely sliced
1 cup coarsely chopped cilantro

Whisk together the mayonnaise, vinegar, lime juice, sugar, soy sauce, and hot sauce in a large bowl. Toss in the remaining ingredients. Refrigerate at least one hour and serve chilled (this step is necessary if cabbage is used instead of jicama).